100+ Gallery Wall Ideas for 2026: How to Create the Perfect Photo Display
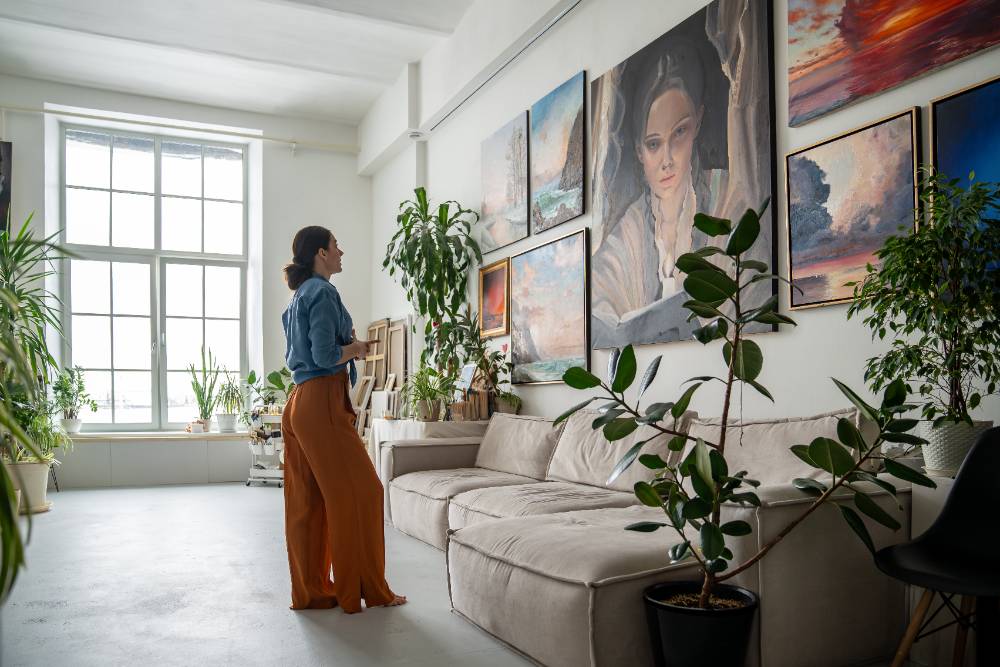
A gallery wall is one of the most powerful things you can do to a room. Done well, it transforms an empty stretch of drywall into something that feels genuinely alive — a display of who you are, where you've been, and what you love. Done poorly, it looks like a bunch of frames that got lost on the way to the thrift store.
The difference between the two? Planning. And the right products.
Whether you're starting from scratch or rethinking a display that never quite worked, this guide has you covered. You'll find 100+ gallery wall ideas for 2026 — organized by room, by style, and by budget — plus a clear step-by-step guide to planning and hanging your display so it looks intentional rather than improvised. Let's get into it.

What Is a Gallery Wall? (And Why Everyone Wants One)
A gallery wall is a curated arrangement of prints, photos, artwork, or decorative objects displayed together on a wall as a single visual statement. It can be a tight grid of matching frames, a loose mix of art and photos, a row of canvas prints above a couch, or a staircase lined with family portraits. There's no single formula.
What all great gallery walls share is intentionality — they feel like they were designed, not just accumulated. The frames, the art, the spacing, and the wall all feel like they belong together.
Gallery walls are popular in the US right now for one simple reason: they work in almost any home. Renters can create removable versions that come down without damage. Homeowners can build permanent displays that become the defining feature of a room. First-time decorators can start small and expand over time. And people with hundreds of photos on their phones can finally give those memories a place to live.
Quick Stats: 'Gallery wall' is searched more than 18,100 times per month in the US. 'Gallery wall ideas' gets 6,600 monthly searches. 'Family photo gallery wall' gets 1,300 — with a CPC of $1.76, the highest-value variant. These are buyers, not browsers.
The Best Products for a Gallery Wall in 2026
Before you plan a layout, you need to know what you're working with. The products you choose will shape everything — the look, the feel, the cost, and how easy the whole thing is to hang. Here are the five best options for a gallery wall in 2026.
1. Canvas Prints — The Classic Gallery Wall Anchor
A canvas print is the most natural choice for a gallery wall — and there's a reason they've been the gold standard for decades. Our gallery-wrapped canvas prints use HP latex inks that resist fading for 75+ years, giving your display the kind of depth and richness that paper prints simply can't match.
Canvas works especially well as the anchor piece in a mixed gallery wall. One large canvas — say, a 20x24 or 24x30 inch statement print — surrounded by smaller framed photos and tiles creates a natural focal point that draws the eye without overwhelming the space.
Popular canvas sizes for gallery walls:
- 8x10 inches — ideal filler pieces in a mixed layout; great for tight grids
- 11x14 inches — versatile mid-size; works in almost any layout configuration
- 16x20 inches — the sweet spot for a living room gallery wall anchor
- 20x24 or 24x30 inches — statement size; one large canvas can anchor an entire wall
Edge options: Our canvas prints come with your choice of folded edge (the image wraps around), mirrored edge (the edge mirrors the border of the image), stretched edge (a neutral color wrap), or white and black edge. For gallery walls, the folded edge or black edge tends to create the cleanest, most gallery-style look.
2. MIXPIX® Photo Tiles — The Renter-Friendly Game-Changer
If you're renting, or you just want a gallery wall you can rearrange without patching holes, MIXPIX® photo tiles are exactly what you need. They mount on any wall surface using the Magnofix® magnetic + adhesive hanging system — no nails, no screws, no damage to the wall. They come down cleanly and go back up anywhere you want them.
Each tile is a printed photo on lightfoam — lightweight, rigid, and completely flat on the wall. The result looks sharp and intentional, not like the flimsy removable prints you might have tried before. A set of nine tiles in a 3x3 grid is one of the most-loved gallery wall formats in American apartments right now.
MIXPIX® tiles work equally well in a uniform grid, a loose scattered arrangement, or a custom shape. And because they're completely rearrangeable, you can swap in new photos whenever you want a fresh look.
Best for: renters, first apartments, dorm rooms, anyone who loves rearranging their space, or as a dedicated 'family photo wall' that grows over time.
3. Metal Prints — For a Modern, Gallery-Style Statement
For a contemporary or modern home, metal prints on aluminum composite are the most visually striking gallery wall option available. The image is infused directly into the aluminum surface, giving colors a luminous depth that no other print format can match. They look incredible on dark accent walls, and the frameless finish gives them a true gallery-installation feel.
A single large metal print can anchor an entire gallery wall. Or mix two or three metal prints of different sizes with canvas or framed prints for a contemporary mixed-media display.
Best for: modern, industrial, or minimalist homes. Dark accent walls. Architectural photography, landscape shots, and high-contrast images.
4. Framed Photo Prints — Classic, Versatile, Timeless
A framed photo print with a bevel-cut mat is the traditional gallery wall element — and it never goes out of style. The bevel cut (45 degrees, to avoid shadow) adds breathing room between the photo and the frame, making even a 4x6 photo look exhibition-ready.
Matching frames in the same color and style (all black, all white, all natural wood) create a clean, coordinated look. Mixed frames in a consistent palette — all black, but different widths — add visual interest without chaos.
Best for: traditional, classic, or transitional homes. s and stairwells. Family portrait displays. Anyone who loves the look of a curated art exhibition.
5. Forex® Photo Boards — Frameless but Substantial
Our Forex® photo boards are printed directly onto hardfoam panels — rigid, lightweight, and completely frameless. They mount flush to the wall and have a clean, poster-like look that works beautifully in modern and Scandinavian-style interiors.
Forex® boards are a great alternative to framed prints for people who want a substantial print without the weight or cost of a frame. They're especially popular for large-format statement pieces in open-plan living areas.
Best for: modern and Scandi-inspired homes. Large open walls. Oversized statement pieces. Budget-friendly gallery walls that still look polished.
How to Plan a Gallery Wall: Step by Step
The biggest mistake people make with gallery walls is picking up a hammer before they've made a plan. Here's how to do it right the first time.
Step 1: Choose Your Wall
Not all walls are created equal for gallery displays. The best gallery wall locations in a typical American home are:
- The wall behind your couch (sofa wall) — the most popular gallery wall location in the US. Wide enough for a substantial display, at perfect eye level for anyone sitting or standing
- The wall above your bed — a natural focal point in any bedroom. Works especially well with a wide, low arrangement or a centered canvas print with smaller pieces flanking it
- The entryway or hallway — a narrow wall that sees high foot traffic. Great for a vertical column arrangement or a single row of prints
- The staircase wall — one of the most dramatic gallery wall opportunities in any home. The diagonal line of the stairs creates a natural guide for a rising arrangement
- The dining room accent wall — behind the table is a natural focal point. Bold, oversized prints work especially well here
Step 2: Measure Your Wall Space
Use a tape measure to note the width and height of your available wall space. For a sofa wall, the gallery wall should ideally span about two-thirds of the sofa's width and sit approximately 6 to 8 inches above the top of the sofa. For an above-bed display, aim for the arrangement to span roughly the width of the headboard, with the bottom edge of the lowest frame about 6 to 8 inches above the headboard.
Write down your wall dimensions before you order anything. Nothing wastes money like ordering prints that are either too small to fill the space or too large to fit comfortably.
Step 3: Pick Your Layout Style
This is the fun part. Your layout determines the entire personality of your gallery wall. Here are the main options:
| Layout Style | Description | Best For |
|---|---|---|
| Uniform Grid | All frames the same size, evenly spaced in rows and columns. Clean, orderly, modern. | Minimalist homes, modern apartments, hallways |
| Salon Style | Mixed sizes arranged in an organic, asymmetric cluster. Art fills the wall from edge to edge. | Maximalist homes, living rooms, statement walls |
| Linear Row | Single row of prints at the same height, evenly spaced. Simple and graphic. | Hallways, above a console table, narrow walls |
| Asymmetric Mix | Different sizes grouped around a central anchor piece. Balanced but not symmetrical. | Living rooms above a couch, dining rooms |
| Vertical Column | Three to five prints stacked vertically. Elongates a narrow wall. | Stairwells, narrow hallway walls, beside doors |
| Diagonal / Staircase | Arrangement follows the diagonal angle of a staircase. Prints rise with each step. | Staircase walls — works with both portraits and landscape prints |
| Organic Scatter | No fixed grid — pieces placed with varying gaps in a loose, natural cluster. | Boho and eclectic interiors, bedroom feature walls |
Step 4: Mock It Up Before You Hang Anything
This is the step that saves the most frustration. Before picking up a hammer, try one of these methods:
- Paper template method: cut paper to the exact size of each print and tape the outlines to the wall with painter's tape. Step back, adjust, live with it for a day, then mark and hang
- Floor mock-up: lay all your prints on the floor in front of the wall. Arrange them until the layout feels right, then transfer to the wall one by one
- Gallery wall planning apps: apps like Hutch, Houzz, and RoomSketcher let you visualize arrangements before anything goes on the wall
Step 5: Nail Your Spacing
Consistent spacing is the difference between a gallery wall that looks curated and one that looks chaotic. The standard recommendation for American gallery walls:
- 2 to 3 inches between frames — tight and graphic; works well for grids and modern displays
- 3 to 5 inches between frames — the most versatile range; used in most living room and bedroom gallery walls
- 5 to 8 inches between frames — airy and spacious; great for large prints and minimalist arrangements
Whatever you choose, keep it consistent throughout the arrangement.
Step 6: Hang From the Center Out
Always start with the center piece and work outward. Identify your visual anchor — usually the largest or most eye-catching print — hang that first, then build the arrangement around it. This prevents the whole display from drifting to one side.
Pro Tip: For MIXPIX® photo tiles, use the Magnofix® magnetic + adhesive system and you can skip the measuring entirely — tiles go up and come down cleanly, so you can adjust the arrangement as many times as you need until it's exactly right.
Gallery Wall Ideas by Room
Living Room Gallery Wall Ideas
The living room gallery wall is the most searched and most viewed room in the US. It's the first thing guests notice, and the display you'll see every day. Here's how to make it work:
- Above the couch is prime real estate — the gallery wall should sit 6 to 8 inches above the top of the sofa and span roughly two-thirds of the sofa's length. A 90-inch sofa works well with a gallery wall that spans 55 to 65 inches wide
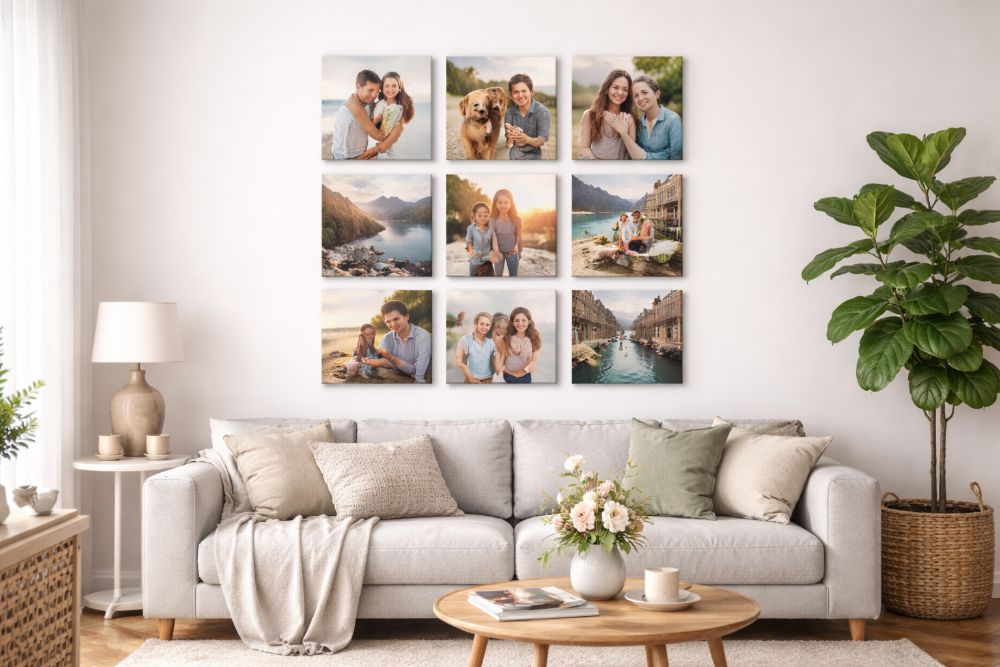
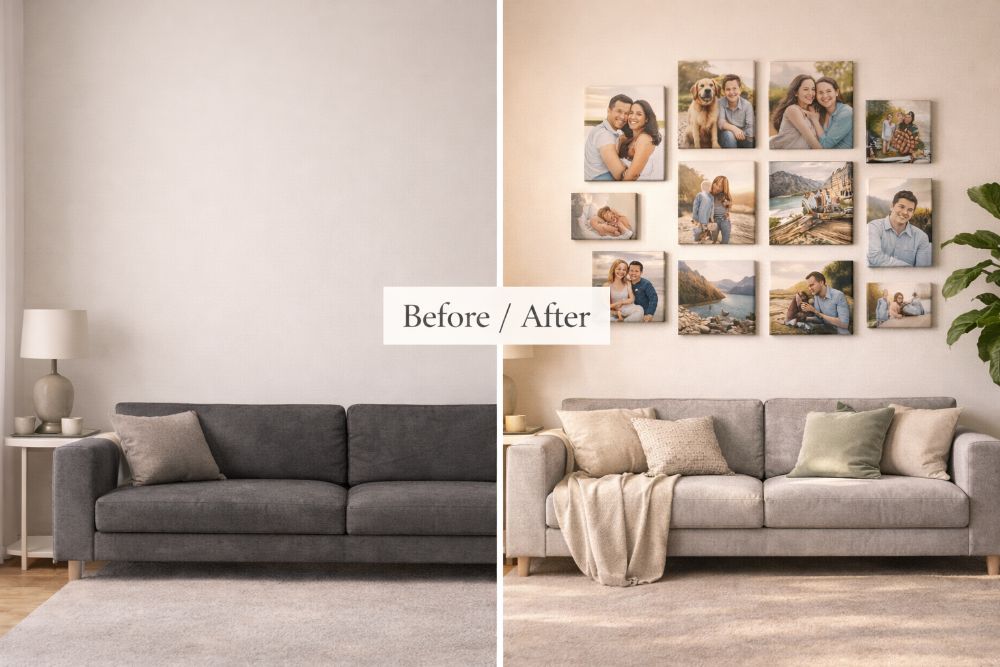
- Mix sizes for visual interest — a large canvas print (20x24 or larger) anchoring the center, surrounded by smaller framed prints and MIXPIX® tiles, creates a layered display that feels intentional and dynamic
- Stick to a limited color palette — three to five colors across all the prints and frames creates cohesion. Black and white frames with one warm wood tone is a universally popular combination in American living rooms
- Family photos + art prints = the sweet spot — mixing personal family photos with purchased art prints gives the display personality without feeling overly sentimental
Living room gallery wall ideas to try:
- Three oversized canvas prints in a horizontal row — 16x20, 24x30, 16x20 — above a long sofa
- A 3x3 grid of MIXPIX® photo tiles centered above a love seat or accent chair
- An asymmetric mix of one large canvas, two medium framed prints, and four MIXPIX® tiles arranged around a central anchor
- Floor-to-ceiling salon-style display covering an entire accent wall with mixed art and photos
Bedroom Gallery Wall Ideas
A bedroom gallery wall has a different energy than a living room display — softer, more personal, more intimate. These are the ideas that work best:
- Above-the-headboard arrangement — a wide, horizontal arrangement centered over the headboard is the most popular bedroom gallery wall format. The display should roughly match the width of the bed: a queen bed (60 inches wide) works well with a 50 to 70-inch wide arrangement
- Single large canvas print — for a calmer, more restful feel, one oversized canvas print centered above the headboard can be more impactful than a complex arrangement
- Soft, personal content — bedrooms suit personal photos, quotes, botanical prints, and travel imagery better than bold graphic art
- MIXPIX® tiles for a rental bedroom — a 3x2 or 2x2 grid of MIXPIX® tiles above a bed looks polished and comes down without any damage when it's time to move
Bedroom gallery wall ideas to try:
- A horizontal row of three vertical canvas prints above the headboard — creates a symmetrical, headboard-like display
- A 5-piece asymmetric arrangement: one large framed print centered, two medium prints flanking, two small prints tucked into the lower corners
- A 2x3 or 3x3 MIXPIX® tile grid for a renter-friendly bedroom feature wall
- A single large black-and-white portrait canvas above a minimalist bed for maximum impact with minimal complexity
Hallway and Entryway Gallery Wall Ideas
Hallways present a unique challenge: they're usually narrow, so you can't step back far enough to appreciate a complex arrangement. The best hallway gallery wall formats work at close range.
- Single linear row at eye level — the simplest and most effective hallway approach. All frames at consistent height, consistent spacing, consistent size or alternating two sizes. Looks intentional from the moment you step in the door
- Vertical stack beside a doorway — three to five prints stacked vertically in a narrow strip beside a doorframe. Adds vertical height to a low-ceilinged hallway
- Alternating sizes in a row — alternate between large and small prints at a consistent center line. The variation adds interest while the consistent center height keeps it orderly
- Match the frame color to the trim — in a hallway, frames that match the color of the door trim or baseboards feel more intentional and architectural
Hallway gallery wall ideas to try:
- A linear row of five 5x7 framed family photos with black frames and white mats, all centered at 57 inches from the floor (standard US eye level)
- Alternating 8x10 and 5x7 framed prints in a single row — large, small, large, small — along the length of the hallway
- A tall vertical stack of three 8x10 canvas prints beside the front door — portrait orientation, all the same size
Staircase Gallery Wall Ideas
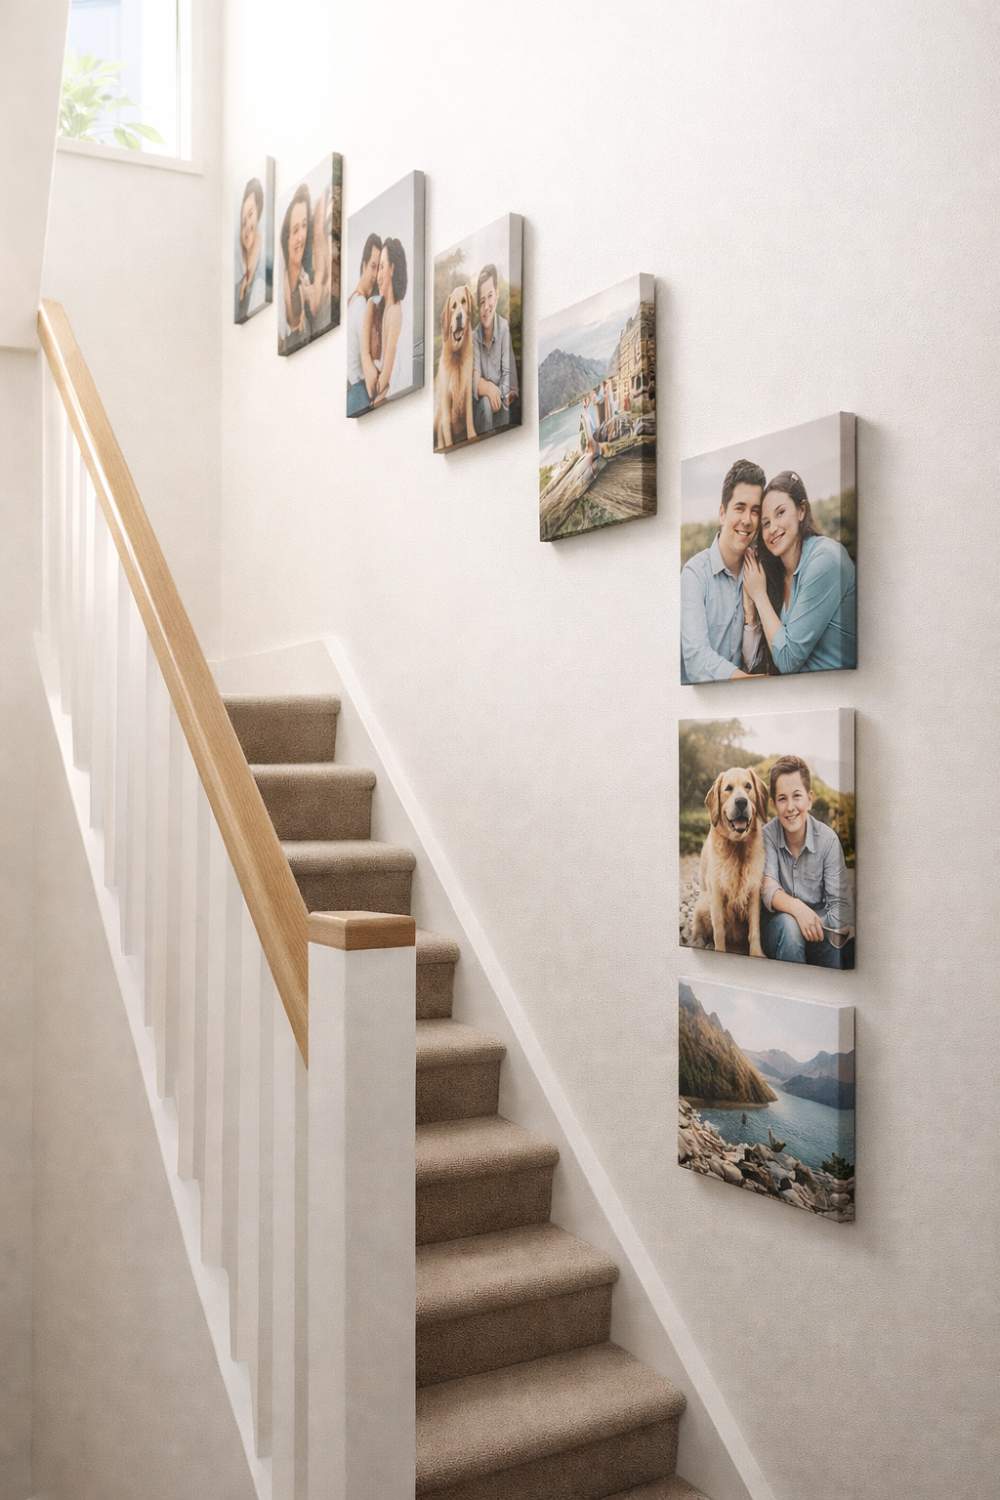
A staircase gallery wall is one of the most dramatic and frequently photographed interior design features in any American home. The diagonal angle of the stairs gives you a natural guide to follow.
- Follow the stair angle — arrange prints so their center lines follow the diagonal rise of the staircase. This creates a flowing, intentional composition that feels designed rather than accidental
- Mix portrait and landscape orientations — the staircase wall benefits from variety in orientation. Portrait frames going up, landscape frames coming back down creates visual rhythm
- Use the 57-inch rule — hang the center of each frame at 57 inches from the nearest stair step directly below it. This approximates eye level at each point on the staircase
- Vary sizes but keep frames consistent — different print sizes add dynamism; matching frame finishes (all black, all wood) keep the arrangement from looking chaotic
Staircase gallery wall ideas to try:
- A rising diagonal arrangement of 8x10 and 5x7 framed family portraits, all in matching black frames with white mats
- A mix of canvas prints and framed photos alternating up the staircase — canvas pieces are frameless and add textural variety
- A dramatic single column of oversized prints rising from the bottom landing to the top — three large prints stacked diagonally
Dining Room Gallery Wall Ideas
The dining room gallery wall is all about impact. People sit and face it through every meal — it should be interesting enough to look at for an hour.
- Go bigger than you think — dining rooms can handle larger prints than most other spaces. A pair of 24x36 canvas prints, or a single 30x40, makes a much more confident statement than a collection of 8x10s at dining room scale
- Bold color and contrast work well — dining rooms don't need to be serene the way bedrooms do. Saturated colors, bold black and white photography, and dramatic landscape prints all look excellent here
- Single large metal print — one large metal print on aluminum composite has the visual drama a dining room wall calls for, especially with good overhead lighting
Dining room gallery wall ideas to try:
- A diptych (matching pair) of large canvas prints flanking a window or doorway
- A salon-style arrangement of mixed art prints, travel photos, and one large anchor canvas covering most of the dining room accent wall
- Three uniform framed prints in a clean horizontal row above a sideboard — simple, architectural, always right
Home Office Gallery Wall Ideas
Since 2020, the wall behind your desk has become a public-facing display — every video call you take shows it to colleagues and clients. A well-styled home office gallery wall is now as much about professional presentation as personal preference.
- Keep it curated, not cluttered — two to five pieces is usually right for a home office gallery wall. More than that can look chaotic on camera
- Art prints + one personal photo = the sweet spot — a few art prints with one meaningful personal photo (not your whole family album) is the right balance for a professional backdrop
- Consistent frames, neutral tones — black or natural wood frames with neutral-colored art work in almost every video call lighting situation
Home office gallery wall ideas to try:
- Three identical black-framed prints in a horizontal row at eye level behind the desk — clean and professional
- One large motivational art print centered behind the chair, with two small canvas prints flanking it
- A 3x1 or 2x2 MIXPIX® tile grid — easily rearranged when you want a fresh look, no tools needed
Gallery Wall Ideas by Style
| Interior Style | Gallery Wall Approach | Best Products | Frame Style |
|---|---|---|---|
| Modern / Contemporary | Clean grid or asymmetric mix with negative space. Maximum 5-7 pieces. | Metal prints, canvas prints (black edge), Forex® boards | Thin black or frameless |
| Minimalist / Scandi | One or two oversized prints. Lots of breathing room. Monochromatic. | Large canvas print (white or black edge), single metal print | No frame or thin natural wood |
| Farmhouse / Rustic | Mix of family photos, botanical prints, and text art. Warm tones. | Canvas prints, framed prints with white mats | Weathered wood, shiplap-style frames |
| Boho / Eclectic | Organic scatter arrangement. Mixed sizes, textures, and orientations. | MIXPIX® tiles, canvas prints, mixed framed prints | Mixed — rattan, wood, black, gold |
| Maximalist | Floor-to-ceiling salon style. As many pieces as the wall can hold. | Mix of all formats: canvas, framed, MIXPIX®, metal | Mixed colors and widths — intentionally varied |
| Traditional / Classic | Symmetrical arrangement, matching frames, consistent mat color. | Framed photo prints with bevel-cut mats | Matching gold, silver, or black frames |
| Industrial / Loft | Large-format statement pieces. Mix of metal prints and canvas. | Metal prints, large canvas prints (stretched edge) | Industrial metal frames or frameless |
| Coastal / Beach | Loose, natural arrangement. Blues, whites, sandy tones. | Canvas prints, MIXPIX® tiles, framed prints | White-washed wood, natural light frames |
100+ Gallery Wall Ideas at a Glance
Here's the full list — use it as a starting point, a checklist, or just for inspiration.
Layout and Arrangement Ideas
- 3x3 uniform grid of MIXPIX® photo tiles in matching square format
- 4x4 grid of MIXPIX® tiles covering a large blank wall — 16-photo mega display
- Horizontal row of three large canvas prints above a sofa — the most popular American gallery wall format
- Salon-style floor-to-ceiling arrangement covering an entire accent wall
- Diagonal staircase display following the angle of the stairs
- Symmetrical arrangement: one large center print flanked by two matching smaller prints
- Diptych display: two matching canvas prints side by side — landscape panoramic feel
- Triptych display: three matching canvas prints as a series — tells a story
- Mixed-size asymmetric arrangement balanced around a large central anchor
- Single oversized canvas print as a solo statement — sometimes one is enough
- Floating shelf display: small prints propped on a shelf, switched out seasonally
- Frame ledge gallery: IKEA Mosslanda or similar shelf filled with leaning prints
- Square grid of nine 5x5 inch MIXPIX® tiles
- Rectangular grid of 2x4 MIXPIX® tiles in portrait orientation
- Mixed-format display: canvas + framed prints + MIXPIX® tiles all in one arrangement
- L-shaped arrangement wrapping around a corner wall
- Arch-shaped arrangement following the curve of a doorway
- Diamond grid arrangement rotated 45 degrees from standard grid
Family Photo Gallery Wall Ideas
- Chronological life timeline: photos in order from oldest to most recent, left to right
- Annual family portrait series: same location, same frame, one photo per year
- 'Our Story' wall: a narrative display of relationship milestones, travel, and everyday moments
- Pet portrait gallery: dedicated wall display of your dog, cat, or other pets — surprisingly popular in US homes
- Four-seasons family display: one photo for each season of the same year
- Multi-generation portrait wall: grandparents, parents, and children displayed together
- Black and white family portrait grid: 3x3 or 4x4 of family photos converted to black and white — timeless
- Kids' artwork gallery wall: their drawings and paintings printed and framed
- Travel memory wall: photos from every trip, organized by destination or chronologically
- Wedding photo display: ceremony, portraits, and candid shots in a cohesive arrangement
Room-Specific Ideas
- Living room: large canvas above couch + two medium canvas prints flanking it symmetrically
- Living room: full accent wall salon display — 15 to 20 mixed prints covering the entire wall
- Bedroom: three vertical canvas prints above the headboard as a triptych headboard alternative
- Bedroom: MIXPIX® tile grid for renters — comes down without any wall damage
- Hallway: linear row of five family portraits with matching black frames and white mats
- Staircase: diagonal display rising with the staircase, frames centered at 57 inches from each step
- Entryway: one large canvas print or metal print as a welcome statement
- Dining room: pair of 24x30 canvas prints flanking a window above a sideboard
- Home office: clean 3-piece horizontal row visible in video call background
- Bathroom: two or three small framed prints adding personality to an otherwise plain wall
- Kids' room: MIXPIX® tiles at kid height — low enough for them to see and add to over time
- Nursery: soft-colored canvas prints and quote prints in a gentle circular arrangement
Style-Specific Ideas
- Modern minimalist: single oversized black-and-white metal print on a white wall
- Modern minimalist: three frameless Forex® photo boards in identical landscape orientation, evenly spaced
- Scandi: two or three botanical prints in thin natural wood frames with generous white mat
- Farmhouse: mix of family photos, 'home' text art, and botanical prints in weathered wood frames
- Boho: organic scatter of mixed-size MIXPIX® tiles and framed prints with rattan and wood frames
- Maximalist: floor-to-ceiling salon display, 25+ pieces, no wall visible behind them
- Industrial: two large metal prints on a brick-effect or dark painted wall
- Coastal: white-washed frames with beach photography and nautical prints
- Art deco: symmetrical arrangement of gold-framed prints with jewel-toned art
- Eclectic: mix of every format — canvas, metal, framed, MIXPIX® — in a single layered display
Budget and DIY Ideas
- Start with three: one large canvas print anchoring two MIXPIX® tiles on either side — the minimum effective gallery wall
- Frame your own photos: order 8x10 prints from canvasdiscount.com and frame in IKEA RIBBA frames for under $5 each
- Black-and-white conversion: convert color photos to black and white before printing — instant cohesion, no color-matching required
- Seasonal swap wall: buy frames once, swap the prints seasonally using a print subscription or holiday collections
- Kids' art gallery: print and frame your children's artwork — costs almost nothing and they'll be obsessed
- Print-it-yourself supplement: mix a few professional canvasdiscount.com prints with hand-lettered quotes or drawings
- One-color frame rule: buy all frames in one color (all black or all white) from any price range — the uniformity makes them look intentional regardless of brand
Gallery Wall Ideas for Renters: No Nails Required
Approximately 44 million American households rent. If you're one of them, 'no nails in the walls' isn't just a preference — it's a lease requirement. Here's how to create a beautiful gallery wall without putting a single hole in the drywall.
Option 1: MIXPIX® Photo Tiles (Best Option)
The most foolproof renter-friendly gallery wall solution. MIXPIX® photo tiles use the Magnofix® magnetic + adhesive system — adhesive goes on the wall, the magnetic backing on the tile connects to it. The adhesive strip comes down cleanly without leaving residue or damage. A 3x3 or 2x4 grid looks professionally installed and takes about 20 minutes to put up.
Option 2: Command Strips for Framed Prints
3M Command strips are the American renter's best friend. They hold up to 16 pounds per pair and come off walls without damage when removed correctly (pull the tab straight down slowly, at a 45-degree angle to the wall — never straight out). They work for framed prints up to about 8x10 or 11x14. For larger frames, use multiple strips.
Option 3: Frame Ledge Shelves
Install narrow floating ledge shelves (which typically require only small pilot holes — minimal damage) and prop prints and frames on them. The advantages: you can swap prints in and out any time without moving anything, and the arrangement is infinitely adjustable. IKEA MOSSLANDA picture ledges are the most popular option in the US.
Option 4: Poster Adhesive Strips
Lightweight canvas prints, Forex® photo boards, and prints-without-frames can be mounted using furniture-grade adhesive strips. The key is not to exceed the weight rating — check the strip's packaging for maximums, and use more strips than you think you need.
Renter's golden rule: MIXPIX® tiles for flexibility and zero damage, Command strips for framed prints up to 11x14, floating ledges for an arrangement you'll want to change frequently.
How to Hang a Gallery Wall: Pro Tips
Once you've planned your layout and ordered your prints, the hanging itself is where most people get nervous. These tips will make the process much smoother.
The 57-Inch Rule
Standard gallery-hanging practice in the US is to center prints at 57 to 60 inches from the floor — the average eye level for a standing adult. This means the center of your arrangement (not the top of the top frame) sits at approximately 57 to 60 inches. For a series of frames, use the center of the overall arrangement as your guide point.
Use a Laser Level
A laser level is the single best tool for hanging a gallery wall. They cost $20 to $40 at any hardware store and make perfectly straight rows effortless. For a grid arrangement, use the horizontal laser line to align the top of a row, then measure down for each subsequent row.
Make a Paper Template First
For complex arrangements, trace each frame onto brown kraft paper or butcher paper, cut it out, and tape the paper outlines to the wall with painter's tape. Move them around until the arrangement is exactly right, mark the hanging points through the paper, then remove the templates and hang. This works especially well for salon-style displays.
Hang from the Center Out
Always hang the central or largest piece first and build outward. If you start at one edge and work across, the arrangement will almost inevitably end up uneven. Center first, always.
Use Two Hooks Per Frame
For any frame wider than 8 inches, use two wall hooks instead of one — one near each end of the hanging wire. This prevents frames from tilting and shifting over time. It's especially important for large canvas prints.
Gallery Wall Ideas at Every Budget
| Budget | What You Can Build | Recommended Products |
|---|---|---|
| Under $50 | A 4-tile MIXPIX® starter display or 3 small canvas prints — enough to make an impact on a small wall or desk area | MIXPIX® tiles (set of 4), small canvas prints |
| $50–$100 | A 6-tile MIXPIX® grid or 2-3 framed photo prints — solid coverage for a bedroom wall or hallway | MIXPIX® tiles (set of 6), framed photo prints, small canvas prints |
| $100–$200 | A 9-tile MIXPIX® grid plus one canvas anchor, or 4-5 framed prints — proper living room or bedroom gallery wall | Mix of canvas prints + MIXPIX® tiles, or 5-piece framed print set |
| $200–$400 | A full mixed-format living room gallery wall — large canvas anchor + framed prints + MIXPIX® tiles, 10-15 pieces total | Large canvas print (20x24+), framed prints, MIXPIX® tiles |
| $400+ | A complete salon-style or full accent wall display with mixed formats, large canvas prints, and metal print statement pieces | Metal print statement piece + canvas prints + full MIXPIX® grid + framed prints |
The Bottom Line
A gallery wall is one of the most personal things you can do to a home. Unlike a sofa or a rug, it doesn't come from a showroom floor — it comes from your life. Your travels, your people, your favorite moments, your taste.
The best starting point is always your photos. Choose the ones that mean the most, order them as canvas prints, MIXPIX® photo tiles, metal prints, or framed photo prints — and put them on the wall where you'll see them every day.
Plan your layout before you hang anything. Start from the center. Keep your spacing consistent. Use a level.
Frequently Asked Questions About Gallery Walls
-
Start with your wall and a plan, not with frames and prints. Measure your available wall space, choose your layout style (grid, asymmetric, linear row), decide on your format (canvas prints, framed prints, MIXPIX® tiles, or a mix), then order your prints before picking up a hammer. Use the paper template method to finalize placement before committing to any holes in the wall.
-
The standard recommendation for American gallery walls is 2 to 3 inches between frames for a tight, graphic look; 3 to 5 inches for the most versatile mid-range; and 5 to 8 inches for a more airy, minimalist display. The most important rule is consistency — whatever gap you choose, keep it the same throughout the entire arrangement.
-
The 57-inch rule is the standard used by most US art galleries and interior designers: hang art so its center is approximately 57 to 60 inches from the floor, which corresponds to the average eye level for a standing adult. For a gallery wall, this means the center of the entire arrangement should sit at 57 to 60 inches — not the top of the topmost frame.
-
For renters or anyone who wants to avoid wall damage, the best options are: MIXPIX® photo tiles with the Magnofix® magnetic + adhesive system (the cleanest and most flexible option), 3M Command strips for framed prints up to 11x14, floating picture ledge shelves for an arrangement you can update at will, or adhesive mounting strips for lightweight Forex® photo boards.
-
The most popular and most effective gallery wall content in American homes combines personal family photos, travel photography, and one or two purchased art prints. The personal photos give the display emotional weight; the art prints give it visual variety and design credibility. Adding a mix of formats — a large canvas print anchoring smaller framed prints and MIXPIX® tiles — adds depth and texture that a single-format display can't achieve.
-
The standard guideline for a gallery wall above a couch is that the arrangement should span roughly two-thirds the length of the sofa, and the bottom edge of the lowest frame should sit 6 to 8 inches above the top of the couch back. For a standard 84-inch sofa, this means a gallery wall about 56 inches wide. The height of the arrangement is more flexible — aim for the center of the display at approximately 57 to 60 inches from the floor.
-
In small spaces, vertical arrangements work better than wide ones — a tight vertical stack of three to five prints draws the eye upward and makes a low-ceilinged room feel taller. MIXPIX® photo tiles in a compact 2x3 or 3x2 grid are a great small-space option — they look substantial without overwhelming a small wall. Stick to no more than five to seven pieces in a small room, and use a consistent frame color to keep the arrangement from looking cluttered.
-
They don't have to — but they should have something in common. Matching frames (identical color and width) create the most cohesive, modern look. Mixed frames in a consistent color family (all black, different widths) add visual interest while staying organized. Completely mixed frames in different colors and styles work in maximalist and boho interiors but require careful curation to avoid looking chaotic. The one-color rule is the easiest shortcut: pick one frame color and stick to it regardless of the frame style, and the arrangement will look intentional.