World Cup Stadium Night Photography: Phone Tips for Evening Kick-Offs
There is a moment, somewhere around the 25th minute of a World Cup night game, when you finally look down at the photos you have taken. The players are tiny smudges on a sea of green. The floodlights have nuked the goalpost into pure white. Your celebration shot is a blur of arms. The crowd is a black wall behind you.
Sound familiar?
Phone cameras are remarkable little machines. They are also genuinely bad at the exact conditions that World Cup evening kick-offs throw at them. Fast motion, mixed lighting, distance, and a stadium full of people who keep bumping your elbow. Most photography guides online focus on DSLRs and zoom lenses costing more than your seat — useless if all you have is the phone in your pocket.
This guide takes a different angle. Instead of bouncing around between camera settings, composition theory, and editing tricks, we walk through the night in order. The shots you should be taking before kick-off. The trick that saves you when the floodlights blow out. The moment when the action gets too fast and what to do about it. The 15 minutes after the final whistle that almost nobody photographs. And finally, the small step most fans skip — doing something with the 400 photos so they actually survive past your next phone upgrade.
It works for any night soccer match: World Cup group games, knockout fixtures, MLS regular season, NWSL playoffs, college soccer under the lights. We use the World Cup as the running example because that is what most of us are gearing up for. The technique travels.

Why your phone struggles after sundown
Before the fixes, it helps to know what you are working against. Stadium night photography stacks four problems on top of each other:
- The light is uneven. Floodlights blast the field; the stands are almost dark. Auto-exposure has to pick one, and it usually picks wrong.
- The action is fast. Soccer plays move at full-sprint speeds, and your phone shutter has a small but real delay between tap and capture.
- You are far away. Even good seats are 50 to 200 feet from the action, and phone zoom is mostly digital, which means it is really just cropping in software.
- Nothing is steady. You are excited. Your row is jumping. Phones compensate for hand shake brilliantly in daylight and badly at night, when the shutter has to stay open longer.
All four get easier once you know which one is biting you in each shot. The next sections walk through your evening in order, with the fixes attached to the moment you actually need them.

Before you leave the house: three minutes of phone prep
This is the part of the night that pays the biggest dividends and takes the least effort. Spend three minutes adjusting your phone settings on the couch before you head out. Once kick-off arrives, you will not have time to dig through menus.
Turn on the highest resolution your phone offers
By default, most phones shoot at a lower resolution to save storage space. Fine for brunch photos. Not fine when Lionel Messi is lifting a trophy 200 feet from your seat. Switch to the maximum your phone supports:
- iPhone Pro: Settings → Camera → Formats → turn on ProRAW or 48MP. Then Settings → Camera → Resolution Control → highest option.
- Samsung Galaxy Ultra: Open the Camera app → settings gear icon → Picture format → highest resolution. Toggle "RAW copies" if you plan to edit in Lightroom Mobile later.
- Google Pixel Pro: Camera → settings → Advanced → RAW + JPEG. JPEGs let you share fast, RAW files give you editing flexibility.
Then check your storage. Plan for at least 5 GB free. A typical World Cup night generates 300 to 800 photos once you start using burst mode, and phones get sluggish when storage runs low — the shutter lag gets worse, which is the last thing you want when a winning goal goes in.
Switch on the grid and the level
Both tools are buried in the camera settings on every major phone, and almost nobody turns them on. The grid gives your eye something to align stadium horizons to. The level (a small yellow bar that appears when you tilt) catches the seat slope you stop noticing after the first half hour. Together they fix about 80% of the wonky-horizon shots people post after a match.
Disable flash. For good.
Flash at a stadium does nothing useful. The field is 100 feet away. Your phone flash lights up about 8 feet. All it does is light up the back of the head of the fan two rows in front of you, ruin your shot, and momentarily annoy everyone in a 15-foot radius. Turn flash off in your camera settings and leave it off. Your section will thank you.
Get a wrist strap
If you do one thing on this list, do this. A $5 phone wrist strap loops around your wrist and means a dropped phone becomes a phone dangling by your side rather than a phone sliding 30 rows down the stands during a goal celebration. The number of phones that go over balcony railings each season is staggering. You can take a year of night photos without one. You will still wish you had it the one time it matters.
In your seat: the holds and the warm-up shots
You have your seat, your scarf is folded over the chair back, and there are 20 minutes until kick-off. This is your photography golden hour. The light is even (the floodlights have just come on, ambient sky still glowing), the field is empty, the crowd is settling in, and nothing is moving fast. Almost every shot you take right now will be sharp. Use this window.
Three holds that beat the shake
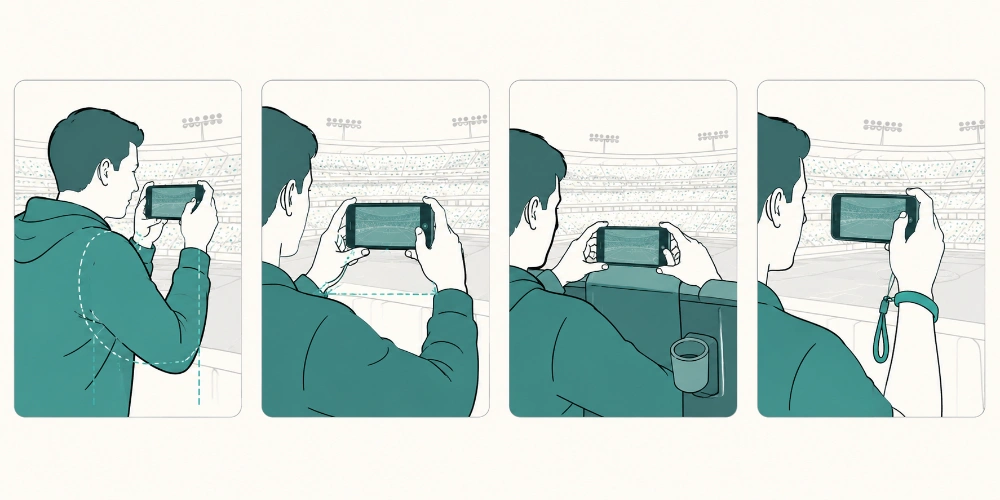
Even the best phone camera gets ruined by an unsteady hand. The four panels above show the holds that actually work in a stadium seat:
- Two-hand stadium grip: phone in landscape (long edge horizontal), elbows tucked tight against your ribs. Your ribs are now acting as a tripod. Breathe out before you tap. Cuts shake by about 70%, and it is free.
- Seat-back brace: if the seat in front is empty (or a friend is in it and does not mind), rest the bottom edge of the phone on the seat back. Now you have a stable shelf. Perfect for slow shots: wide stadium views, the teams walking out, the half-time panorama.
- Arm-rest stabilizer: most seats have an armrest or cup holder. Tuck your forearm into it and let the elbow do the work. Combined with the two-hand grip, this is the steadiest hold available without a tripod, which is good because tripods are banned at most major stadiums anyway.
Lock auto-exposure on the field
This is the single most useful trick on this list, and almost nobody knows it. Most phones let you tap and hold on a part of the screen to lock the focus and exposure on that spot. On iPhone, hold the field area for two seconds until you see "AE/AF LOCK" appear in yellow at the top of the screen. On Samsung Galaxy, tap and drag the brightness slider after tapping to lock.
Why this matters: when you lock exposure on the bright field, your phone stops freaking out about the dark stands every time you re-frame. Your photos look consistent. Brightness does not jump up and down between shots. This single trick is the difference between a phone gallery that feels professional and one that feels random.
Drop the exposure a touch
After you tap to focus, a small sun icon appears next to the focus box. Slide it down about a third of the way. The bright spots stop blowing out. The grass looks greener. The white kits stop reading as solid blocks. The colors of the goal nets, the line markings, the floodlight haloes — all of them start to look the way they look in real life.
The empty-stadium wide shot
Before the players walk out, when the field is empty and the floodlights have just come on, shoot the whole bowl from your seat. This is the easiest stadium shot to nail: no fast motion, even light, the architecture doing most of the work. Hold in landscape, brace against the seat back, get the whole stadium in the frame.
This shot — the stadium glowing before anything has happened — is the photo most people pick later when they decide to print one memory from the night. The atmospheric texture works particularly well on a large gallery-wrapped canvas print because the canvas weave softens the digital sharpness of the floodlights, giving it a more cinematic feel than a glossy paper print would. We will come back to that at the end.
Kick-off and the first 20 minutes: building your gallery base
The opening 20 minutes of a match have a slower visual rhythm than most fans realize. The build-up shots are the ones that age best, and they are often easier to get than action photos.
The walk-out and the anthem
When the players emerge from the tunnel, you have about 90 seconds of slower-paced action where everyone is in roughly the same place. Use burst mode (hold the shutter button on iPhone, tap-and-hold on most Android phones) and you will get 10 to 20 frames to choose from later. One of them will have the captain looking the right way.
During the anthem, switch to landscape and shoot wide. The line of players, arms locked, kit gleaming under the lights, with a wedge of crowd visible behind them — this is one of the few moments in a match when everyone is still. Phones nail this shot. Take three or four with the seat-back brace and pick the sharpest one later.
Detail shots: the small things that humanize the gallery
Most fans only shoot wide. Add at least three detail shots to your night: your ticket on the seat, your friend’s hands holding a scarf, the half-eaten pretzel and program on the cup holder, the floodlight against the dark sky directly above your seat. Phones are brilliant at close-range shots because the light is consistent and the subjects are close. These are the images that humanize the gallery six months from now.
When the action speeds up: action shots that survive shutter lag
Action shots are the hardest thing your phone will be asked to do all night. Players sprint across the field at 18 to 22 miles per hour. The ball moves faster. Your phone has roughly a half-second delay between tap and shot — longer at the start of the match while the camera is still warming up. By the time you see the goal go in, the photo you take will be of the post-goal celebration, not the goal itself.
That is fine, actually. The celebration is usually the better shot anyway. But there are ways to get closer to the moment.
Burst mode is non-negotiable
Hold the shutter down for two to three seconds and your phone fires a burst of 10 to 30 frames. One of them will be the moment you wanted. The other 25 you delete later. This is exactly how professional sports photographers work — they shoot thousands of frames per game and keep maybe 50.
Burst mode also forgives shutter lag. The first frame might miss the goal, but frames three through eight will catch the celebration: the wheel-away, the slide, the team pile-on, the captain pointing at the crowd. That second of celebration is usually more photogenic than the goal itself.
Anticipate, do not react
The easiest way to nail action shots on a phone is to be already holding the shutter before the moment happens. Watch the game and start a burst when you sense something building: a corner kick swinging in, a fast break developing, a penalty being set up. The burst will already be running when the goal lands. You will not have to react in time.
This means you fire a lot of useless bursts. That is fine. Storage is cheap, and you will get one keeper for every five attempts. Over a 90-minute match, that adds up to plenty.
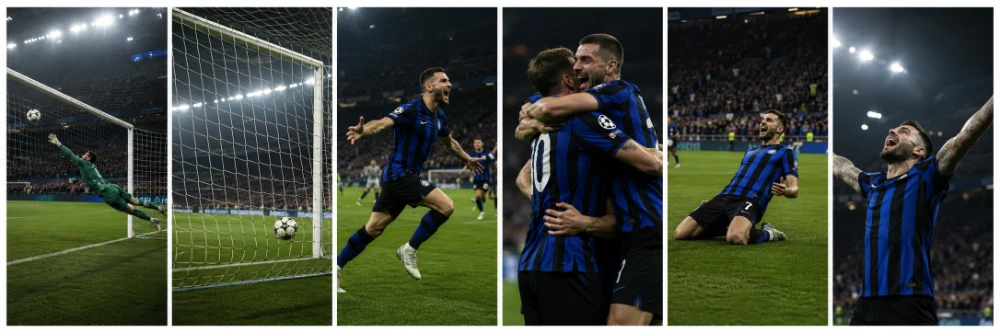
A neat side effect of burst mode
Burst mode often gives you three or four near-identical frames from the same moment that all look great in slightly different ways — the lean, the leap, the landing, the roar. Instead of forcing yourself to pick one, you can print the whole sequence as a set of MIXPIX® photo tiles. The Magnofix® magnetic and adhesive hanging system lets you arrange the tiles any way you want, swap them later when a new tournament comes around, and rearrange the sequence on a whim. A four-tile celebration sequence on a kitchen wall has a comic-strip feel that no single big print can match.
Forget the zoom; crop later
Pinch-to-zoom on a phone is digital zoom, which means it is software cropping a smaller piece of the sensor. The further you zoom, the worse the image quality gets, especially in low light where the sensor is already working hard. Shoot at 1x zoom (or 0.5x if your phone has an ultra-wide lens) and crop in later using the Photos app or Lightroom Mobile. You get a sharper original, and you can crop different versions for different uses — one for Instagram, one for a print, one for the family group chat.
Use the volume button as the shutter
Most phones let you press the volume-up button to take a photo. This is more accurate than tapping the screen because the button press does not happen on the same surface as the screen, so it does not introduce micro-shake. For action shots in a noisy stadium where your finger is bouncing, the volume button is steadier.
When a goal goes in: turn around
Here is the thing experienced sports photographers know. Five years from now, the goal photos will be on Wikipedia. The fan photos will only exist in your phone. The shots that age best from any World Cup match are not of the players. They are of the people watching.
Your kid in an oversized national team shirt. Your group reacting to a late equalizer. The couple two rows over crying after their team gets knocked out. The teenager in front of you mid-roar. These are the photos that get printed, framed, and passed around at gatherings years later.
Shoot the reaction, not the action
When something dramatic happens on the field, train yourself to turn around and shoot the crowd instead. It feels counter-intuitive — your instinct is to film the goal you just heard — but every TV broadcast in the world is already filming the goal. Nobody is filming the reaction in your section. Thirty strangers screaming together is something only you can capture, and only from your specific seat.
Get close to your group
Phones are best at close-range photography. Make use of it. Lean in toward your friends, hold the phone at about 18 inches from their faces, and shoot during the high-energy moments: the kick-off cheer, the half-time toast, the full-time hug. These photos beat anything you can shoot from 100 feet away from the field.
Close-up reaction shots like these are the ones that look best in a small wall grouping later. Personal, formal-feeling photos suit the white mat (the bevel-cut border around the image) that comes with framed photo prints. The mat reads as deliberate — it signals "this matters" — in a way that makes a single family-at-the-game shot stand out from the broader sports imagery around it. A grouping of three framed reaction shots from one match makes a clean hallway feature without taking up the space a large canvas would.
Half-time and the final whistle: the easy wins most fans miss
Two windows in every match are objectively easier to photograph than the other 90 minutes: the 15 minutes of half-time and the 15 minutes after the final whistle. The action has stopped, the lights are still on, and almost nobody is shooting. Use them.
The half-time panorama
Most newer phones can shoot a panorama by sweeping the camera slowly across the stadium. Do this at half-time when the field is empty and the lights are at their brightest. Stand up, hold the phone in portrait orientation (yes, portrait — the camera sweeps horizontally and stitches a wide image automatically), and pivot slowly from left goal to right goal. The result is a long, cinematic image of the whole bowl from your row. It almost always becomes the centerpiece of any printed gallery from the match.
Take two: one of the field, one of the crowd behind you. The second one is rarer and more interesting in five years.
Panoramic stadium shots have a poster-quality composition on their own — the curve of the bowl, the geometry of the floodlight gantries, a single dramatic light against the dark sky. Shots like these, printed as custom posters on satin or matte stock, give you the cinematic feel of a movie poster at a fraction of the cost of a framed canvas. They suit younger sports fans particularly well: a kid’s bedroom wall with three or four match posters from a tournament run is a moodboard that ages beautifully.
If you have not hung a poster before, our guide on how to hang a poster walks through the simple options — from sticky strips for rental walls to proper wood frames — in plain English.
The shots after the final whistle
Almost nobody shoots the walk-out from the stadium. Everyone is busy leaving. But the 15 minutes after the final whistle — the crowd thinning, the floodlights still on, the field workers starting to roll the goal nets in — has a quiet feeling that contrasts beautifully with the chaos of the game. Linger for a few minutes. Shoot the empty seats. Shoot the team flag still hanging from the upper deck. Shoot a wide of your section with the people now leaving.
These end-of-night shots are some of the most evocative photos you can come home with, and they are easier to take than almost any other shot of the night because the action has fully stopped.
Back home: five minutes of editing fixes everything
Even with all the settings dialed in, your phone photos will benefit from a few minutes of editing. You do not need Photoshop. You do not need a degree in post-processing. You need to do three things, and they take about 30 seconds per photo.
Lift the shadows
In the Photos app on iPhone, tap Edit → the dial icon → Shadows. Slide it up about 25%. The dark stands, the players’ faces, the crowd in the background — all of these become visible without making the photo look fake. On Samsung Galaxy and Google Pixel, the same control is in the Edit menu under "Tonal" or "Adjustments." This single edit is the difference between a photo that looks like a phone snap and one that looks like it came off better gear.
Pull back the highlights
In the same menu, slide the Highlights down about 15%. This brings the floodlights and white kits back from the blown-out range, restoring detail you can almost always recover from a modern phone photo.
Add a small amount of warmth
Stadium floodlights are usually slightly cooler than warm indoor light, which can make night photos feel a touch sterile. Slide the warmth or temperature setting up by 5 to 10 points to give your photos a more atmospheric, cinematic feel. Do not overdo it — you are aiming for the late-evening glow, not orange.
Save the edits as a preset
Both the iPhone Photos app and Lightroom Mobile let you copy your edits from one photo and paste them onto a batch. After you have edited one shot from the match the way you like it, copy the settings and paste them onto the rest. You can edit 200 photos in about 15 minutes this way, and they will all share the same look — which makes them feel like a curated set rather than random snaps.
Once the floodlit shots are edited, see how they look
Editing reveals which shots have real wall potential. The ones that pop after a shadows lift are usually the floodlit dramatic shots: a goal celebration with the lights flaring behind, the empty stadium glowing at half-time, the goalkeeper diving against a dark sky. Photos like this come alive in print on a format that holds deep blacks and rich color — typically a metal print on aluminum composite. The HP latex inks give floodlights a glow on the wall that mimics how they looked on the night, and the slight gloss finish makes stadium grays and crowd shots carry better than they would on canvas.
See it in action — fans capturing the night their way:
Printing the keepers: what to do with 400 photos

Here is the part of the process most people skip. They take 400 photos at a match, post 8 to Instagram, and let the rest sit in their phone forever. Six months later, those photos are buried under thousands of other shots and effectively lost. The fix is small: take the 30 best photos from each World Cup match you watched and do something physical with them.
A book for the whole tournament journey
A photo book is the format that captures a full tournament best. One double-page spread per match: a wide stadium shot, three or four mid-action photos, a couple of fan reactions, the score, and a one-line note about the day. Across the full tournament that is 30 to 60 pages of memory, in your hand, in a format that does not get lost in a phone update.
Photo books work better than printed albums for sports content because the page sizes are flexible, you can mix landscapes and portraits on the same spread, and the digital ordering process is quick. Most photo books from a single World Cup take about an hour to lay out and arrive in a week.
One big shot is worth ten little ones
Most matches give you one photo that is clearly better than the rest. The wide pre-match bowl. The trophy lift. The shot you keep going back to in your camera roll. Print that one big. One large shot above a couch carries a whole World Cup memory more powerfully than ten smaller prints scattered across a wall.
Choose the format that suits the photo, not the other way around. Atmospheric wides tend to belong on canvas (the texture softens digital sharpness). Bold action and floodlit dramatic shots work better on metal (deeper blacks, richer color). Family-at-the-game shots suit framed photo prints with a white mat. Burst-mode sequences look best as a tile set on the kitchen wall. There is no single right answer — the choice depends on what the photo is doing.
Common mistakes that ruin stadium night photos (and the easy fixes)
| Mistake | What it looks like | The fix |
|---|---|---|
| Using flash | Bright back of someone’s head, washed-out foreground, dark everything else | Turn flash off and leave it off in every stadium setting |
| Pinch-to-zoom in low light | Pixelated, grainy, soft-edged blob where the players should be | Shoot at 1x and crop later in Photos or Lightroom Mobile |
| Single-tap shots during action | Missed goals, blurry players, off-timing | Use burst mode — hold the shutter for two to three seconds |
| Letting auto-exposure rebalance every shot | Inconsistent brightness across the gallery; some dark, some blown out | Tap and hold to lock AE/AF on the field, then keep shooting |
| Night Mode on for action shots | Players turn into running smears | Turn Night Mode off for action; turn it on for still scenes only |
| Shooting in portrait orientation | Wasted side space, cramped stadium feel | Shoot in landscape (long edge horizontal) for wide stadium shots |
| Forgetting to lift shadows in editing | Crowd looks like a black wall, faces are lost | Slide Shadows up 25% in your editor of choice |
Final thoughts: the photo you wish you had taken
Everyone who has been to a World Cup night game has the same regret afterwards. There was one moment — a goal celebration, a fan reaction, the trophy lift — that they did not get on camera because they were too busy living it.
That is actually fine. Being present for the big moments is the point. The goal of stadium night photography on your phone is not to capture everything. It is to come home with 30 or 40 photos that take you back to the night, in a format you will actually look at.
The settings, the holds, the editing tricks — they all serve that goal. Set the phone up right, use burst mode for action, lock exposure, shoot wider than you think, and turn around for the crowd. Then edit lightly, print a few keepers, and let the rest live in your phone gallery until you forget them and rediscover them five years later, mid-scroll, on a Tuesday afternoon.
The World Cup will end. The photos you took on your phone, if you do something with them, will not.
Frequently Asked Questions About World Cup Phone Photography
-
Yes — with a few caveats. Modern phones (iPhone 13 onwards, Samsung Galaxy S22 onwards, Google Pixel 7 onwards) can take night stadium photos that look great as social media posts and print up well to about 16 x 20 inches without quality issues. They cannot match a $4,000 DSLR with a 400mm lens for tight action shots. But for atmospheric wides, fan reactions, half-time panoramas, and detail shots, phones are more than capable. The trick is knowing which shots to chase and which to leave to the broadcast cameras.
-
As of right now, the iPhone Pro models, Samsung Galaxy Ultra models, and Google Pixel Pro models all handle low-light stadium conditions well. The Samsung Galaxy S24 Ultra has the best raw zoom range. The iPhone 16 Pro has the strongest video. The Google Pixel 9 Pro has the best auto-edit features. For most fans, any of these phones will get you 90% of the way there. The other 10% is technique, not gear.
-
Only if you plan to edit the photos in Lightroom Mobile or another full editor. RAW files are 4 to 6 times larger than JPEGs, take longer to write to storage (which slows burst mode), and need editing to look good. For most fans, shooting the highest-quality JPEG is the better balance. RAW is worth it if you are serious about printing the photos large, where the extra editing flexibility actually pays off.
-
Three things in combination. First, lock focus and exposure on the field before the play begins (tap and hold). Second, use burst mode — you will get 10 to 30 frames in a row, and at least one will be sharp. Third, brace your elbows against your ribs or the seat back to reduce shake. If you are still getting blur, try Pro or Expert mode (Samsung, Pixel) and manually set the shutter speed to 1/500 or faster. iPhone does not have manual shutter control in the default camera, but third-party apps like Halide or ProCam do.
-
Almost certainly not. Most major stadiums ban tripods, monopods, selfie sticks, and any equipment with a "professional camera" appearance. Stadium rules generally allow personal phones for personal use only — no commercial gear, no removable lenses, no tripods. Read your venue’s rules before traveling. If you really want a stable shot, use the seat back as a brace or pick up a small folding mini-grip that doubles as a stand.
-
A typical fan with a phone takes 300 to 800 photos across a 90-minute match, mostly because burst mode generates a lot of frames per moment. Plan for at least 4 GB of free phone storage before you arrive. Most of those photos will be deletes — you keep 30 to 60 keepers from a full match if you are honest with yourself in editing.
-
It depends on the photo and the size. A well-exposed wide stadium shot from a modern phone, taken at full resolution, prints beautifully at 20 x 30 inches on canvas and 16 x 24 inches on metal. A heavily-zoomed action shot from the upper deck probably maxes out at 8 x 10 inches before quality drops off. The rule of thumb: if the photo looks sharp at full screen size on your phone, it will print well at moderate sizes. If it looks soft on the phone, it will look worse printed.
-
Most of the techniques in this guide still apply. Lock exposure on the screen if you are filming the TV. Turn the lights down to reduce reflection. Shoot the room and the people more than the screen itself — nobody wants a photo of the TV later, but everyone wants a photo of the group reacting to the late winner. Wide group shots from a bar during a World Cup age incredibly well, even if they technically have nothing to do with the soccer.